You broke it didn’t you? Well here’s how to fix the blade not turning or cutting issue with the GLM44 Aldi Ferrex Electric Lawnmower.
Yep, it’s another one of these posts where I try and stop consumer waste going to landfill. If your trusty Aldi Ferrex electric lawn mower (model GLM44 or GLM44A) makes all the noise of a lawn mower, but doesn’t cut the grass, then the drive gear between the motor and output shaft may be damaged. This could just be a broken or worn drive belt, or it could be something a bit more serious – but still repairable with a few basic tools and minimal cost.

Why write a blog on repairing a lawn mower?
I know, I know. But, for some time now I have really come to despise our consumerist culture of throwing things out when they stop working. Especially if it involves lots of plastic going to landfill. So, when I couldn’t find any information on the issue with the Aldi Ferrex Electric mower (and the replacement parts to fix it), I decided to write a guide in the hope that it might save a few more lawn mowers from going to landfill, and save some people a few quid too.
Parts list and availability


There is an exploded parts view and part list available for the GLM44, here and the GLM44A here. Some parts are available to order or can be found elsewhere online. But not the drive gear or ‘Gear Block’. I scoured ebay, google shopping, amazon and aliexpress – I even tried to find some contact details for the Chinese company that makes these Ferrex mowers – but found absolutely no trace of any replacement parts for the drive gear / drive box.
Dismantling / Diagnosing the fault with the Aldi 44cm Electric Lawnmower
Disclaimer – this is mains connected equipment with fast spinning sharp bits. If you aren’t confident of making a safe repair, then consider if you should be doing this / asking someone who can. Disconnect the lawnmower from the mains first.
It’s been well used and the blade had taken a couple of big hits. Then after some time away I tried to cut the lawn when it was really long… this caused a blockage, stopping the blade. The motor kept turning and either snapped the belt or bunt out something inside. It didn’t smell good and I thought I had killed it. Time to open it up and see what could be done…

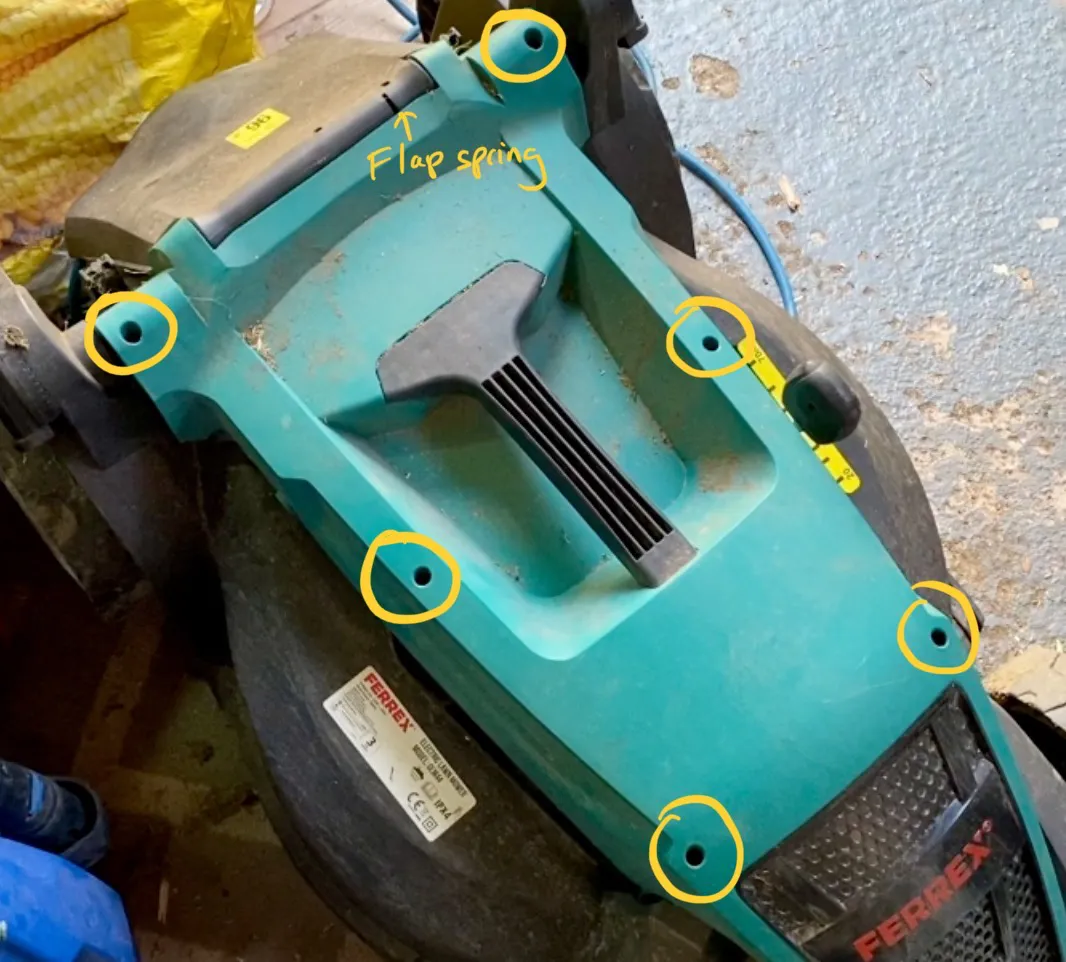
The lawnmower comes apart very easily. The top cover, secured by 6 Philips head screws and two clips, removes to reveal the motor and drive mechanism inside. The cable is secured against tension damage by two Philips screws and a plastic bracket. Undo this to free the cable, giving room to allow the motor to be moved on to a work bench once it is freed. During reassembly make sure you insert the ‘grass box flap spring’ in to the hole to the top of the rear of the mower, above where the cut grass exits the mower.
Next, the blade retaining nut requires a 13mm socket or spanner to make short work of removing the blade. Watch your fingers. The little plastic surround isn’t vital, it just stops the blade being installed the wrong way round. Remove it now or later.

The motor and drive mechanism of the GLM44/GLM44A has five screws holding it in place and these are accessed from underneath. There are four around the blade shaft. The remaining screw, found near the front of the grass cutting area, will likely be quite rusted. You might need to drill this out (and replace with a new screw). I used one of these screw extractor sets to remove it. The motor and drive gear then lifts out the top.
At this point you should be able to see which, of the two modes of failure, your lawn mower has succumbed. One mode is a snapped belt and it should be easy to see if that is the case.
If the belt is still intact, but the larger of the two pulleys is loose, then this pulley has separated from the output shaft and is no longer able to transmit power to the shaft. The sleeve bushing that sits between these two parts has become loose. As it slips it creates friction and destroys itself. In this case the repair is slightly more involved, but far from impossible.
Aldi Ferrex electric lawnmower: Replace a broken belt

This is a TLDR of the steps. If you get stuck, then there is more detail below:
- Remove the lower housing on the drive gear housing
- Remove output shaft lower housing and or/the output shaft and pulley (they may come out separately or as one unit)
- Fit a new belt and reassemble, making sure the belt is tensioned and will not slip
To replace a broken belt, there are four screws securing the drive gear lower housing cover to the housing. Remove the lower housing cover. You will need to remove the plastic locating bush off the bottom of the output shaft. You can achieve this by prising off with a screw driver.
The drive housing lower cover has a friction fit with the bottom output shaft bearing, but with some wiggling and pulling it can be persuaded to come off of the shaft/pulley combination. You will likely end up removing the pulley and output shaft from the motor and drive gear housing at this point.
Watch out for the compression washer that sits in the top of the drive gear housing – above the top bearing of the output shaft – as it can easily pop out and roll away and hide under your work bench. Ask me how I know…
That large pulley on the output shaft? It’s a safety brake…
The output shaft pulley is also a brake for the cutting blade. Torque from the motor, when running, will cause the two metal levers to move outwards, releasing their grip on the friction material (which is hopefully still sat in place under the drive gear housing). When the power is cut from the motor, these levers are pulled inwards by springs to put pressure on the friction material, and this brings the blade to a quick stop.
This safety feature makes reassembly a little tricky as the levers get in the way – they need to be locked open for reassembly. Alternatively you need to apply torque to the output shaft, using some water pump pliers or similar, to get the levers to open up.
Replace the belt and refit
Once the mower’s gear housing cover is off, it’s a case of replacing the belt. The long way of doing this is to:
- Insert the output shaft and pulley back into the lower housing
- Pry apart the levers of the output shaft pulley / safety brake.
- Lock the levers open by placing a tool through one of the four holes in the lower housing cover, aligned with the gap you create when pulling the levers apart (can be tricky).
- Loosen the four screws holding the motor to the drive housing, allowing it to move position
- Place a new belt around the output shaft pulley
- Insert the output shaft and pulley back into the lower drive housing, making sure the belt also goes around the drive pulley from the motor. It needs to stay on on both pulleys
- Secure the lower housing cover with the four screws
- push the motor away from the pulley to tighten the belt and tighten one of the screws closest to the output shaft
- With one screw tightened, you can use it as a fulcrum to lever the motor away from the output shaft and increase tension on the belt. Then tighten down the other screw closest to the pulley. Repeat this process with the other side until you think you have enough tension on the belt and then tighten the other two screws. If you don’t have enough tension, the belt will slip

Alternative method of installing the new drive belt:
- Secure the drive housing and motor in a vice
- With the lower housing still removed from the output shaft and pulley, reinstall the pulley most of the way (it won’t go the whole way in as it will be blocked by the friction material).
- Place the new belt over both pulleys – the output shaft will be off-centre at this point.
- Grip the bottom of the output shaft with some water pump pliers in one hand, turning it counter clockwise (I think!) whilst also pushing it to centre it…
- …whilst holding the outer part of the brake/pulley with your other hand – creating enough torque to open the brake levers
- With the brake levers open, it’s possible to push the output shaft into position in the housing
- The levers and friction material should hold the output shaft in the centre, allowing you to install the lower housing cover into position with the four screws.
- Check the tension on the belt
GLM44 Aldi Electric Lawn Mower: Fixing the pulley and output shaft back together
The other mode of failure is the sleeve bushing that secures the pulley to the output shaft has given up – as the pulley starts to slip it creates enough friction to melt the bushing and vaporise itself into lots of black melted plastic and dust you will find inside the drive housing.
Follow the steps for the replacement belt above to dismantle the drive housing and remove the pulley and drive shaft.
This is a summary of the steps involved:
- Remove the lower housing on the drive gear housing
- Remove output shaft lower housing and or/the output shaft and pulley (they may come out separately or as one unit)
- Clean belt and housing of melted plastic. Examine belt for damage and replace if necessary.
- Clean the mating surfaces of the shaft and pulley
- Check fit of replacement sleeve bushing and remove friction surface with a file (take precautions for toxic dust)
- Use JB weld or similar epoxy to mount the pulley, sleeve bushing and pulley together. Tap the sleeve bushing into place with a socket and hammer
- Add more JB weld to create a strong bond.
- Let the JB weld or epoxy cure properly before reassembly
The top bearing on the output shaft should prise off quite easily. After doing this the entire pulley should lift easily off the output shaft.
Remove the lower housing from the bottom of the output shaft if you haven’t already. Next, clean up the inside of the pulley housing, the drive belt (which may have melted plastic in between the ribs) the output shaft, and the inside of the pulley (which also acts as a safety brake – see above). Use a file and or a brass/nylon brush. It’s important to get these surfaces nice and clean if the repair you are going to make is to last.
Parts for the repair
You will need to buy and install a replacement sleeve bushing. The outer diameter of the drive shaft is 18mm and the inside diameter of the pulley is 20mm. So a bushing like this or this should fit, preferably the length should be about 20mm. If you can’t find a flanged bushing of the right length then combine it with an unflanged bushing and cut down to size.
The flange at the top of the bushing will make it much easier to install and create a stronger repair. If it has an open join on one side then that will also make it easier to resize (if necessary).

This is similar to the flanged, sleeve bearing that I bought from Amazon to connect the output shaft to the output pulley.
The bushings I link to above are designed to be a bearing, which isn’t what we want as the inside has a teflon like material. This must first be removed with a file. Don’t breath this stuff in! Do it outside and/or wear a mask. You might also need to test the fit of this new sleeve busing into the pulley and adjust the size with a file to reduce its diameter.

The magic ingredient: JB Weld (amazon). It gives a strong hold, but it isn’t indestructible. Make sure to apply it in a way that gives a strong repair.
It isn’t enough to simply press the new flange bushing in place and rely on a friction fit – it needs to be secured in place. I used JB weld, which is perfect for fixing these materials in place and should give a very strong bond. Wear gloves when using JB Weld as it can damage your skin.

Add a light coating of JB Weld around the shaft, particularly around the cut outs where the pulley will sit. Add a light coating to the inside of the pulley. Don’t add too much or you might contaminate the bottom pulley. Slide the pulley on to the shaft (the right way up!). Next, coat the sides of the new sleeve bushing in JB weld and then place this on to the shaft. Tap it down in between the pulley and shaft with a socket and hammer, being careful not to damage the bottom bearing.
Next add some more JB weld around the top of the sleeve and pulley to help secure the three parts together. Be as liberal as you can with it, but don’t add too much – the friction material needs to sit between the metal levers of the brake mechanism when installed back into the housing.
For optimum bond strength, leave 24 hours to cure. Although it will be touch drive after 4, leave it the full 24 hours and then reassemble (see steps listed above for replacing a snapped belt).
A fix … and some more plastic avoids going to land fill
Being the end of the season, it hasn’t been fully tested – but the repair held fine for a few runs and seems to be working fine. Only time will tell. I probably don’t need to say it, but take care to avoid hitting the blade on hard objects or cutting overly long grass to get the most out of the repair!
Leave a Reply